2-Day Expedited Shipping Only $14.95 - See Restrictions
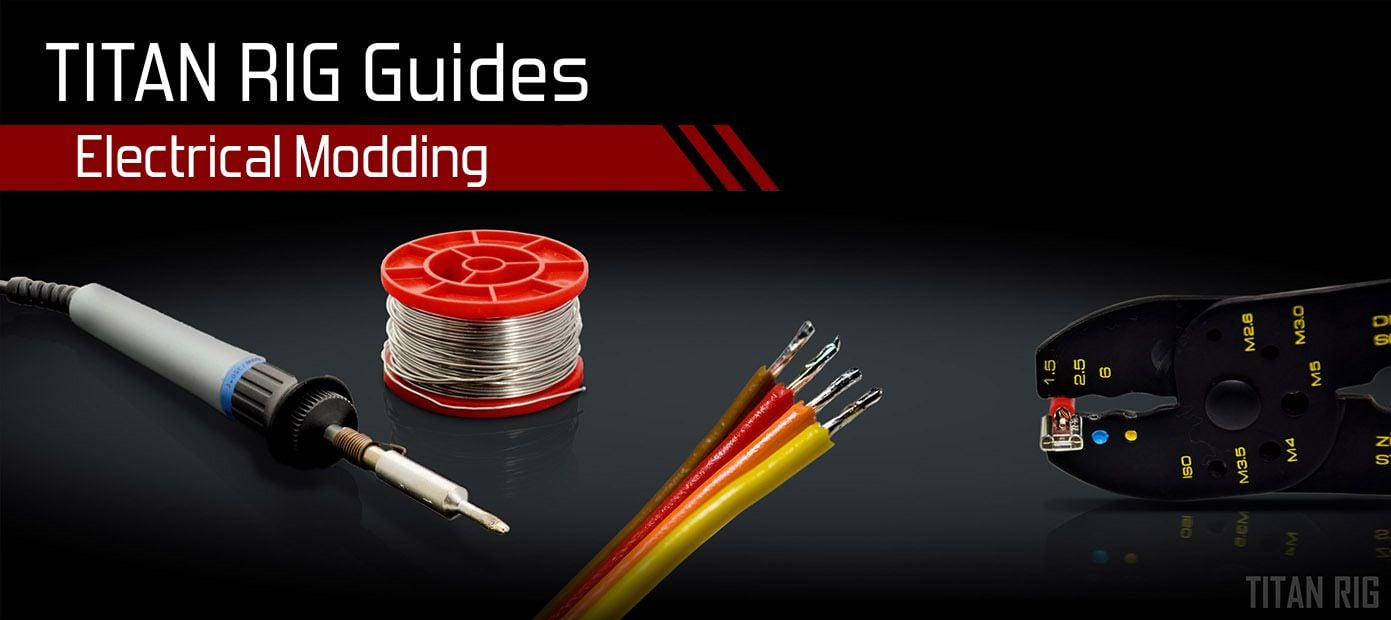
PC Modding - Electrical Mods
March 14, 2022 1
“PC modding” is a really wide term – it covers everything from paint to etching to total conversions based on a theme. It’s really any modifications you make to your PC.
Today I’m going to look at electrical mods specifically. My last modding post covered some of the options in replacing the power switch on your PC, but it was meant to be just a list of ideas. Today we’re going to dig a little deeper into the nuts and bolts of electrical modding – what you need and some of the different options available to you for the mod you have in mind.
The Basics
Tools
No matter what kind of electrical mods you’re planning on, there are some basic tools you’ll need to get them done.
Disclaimer: I have a tendency to go on too long when I talk about tools so I’ll keep this section brief.
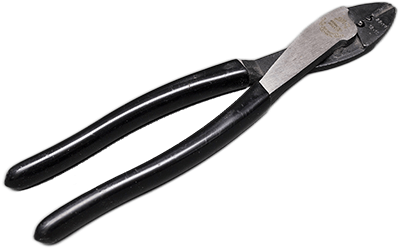
Wire Cutters – for cutting wire.

Flush cutters have jaws with a single bevel. The back side of the jaws are flat or slightly curved with no angle to the cutting edge. This lets them cut wires *very* close to things like connectors and circuit boards. They’re really handy tools for other cutting tasks also.
The biggest drawback to flush cutters is fragility. The design and sharpness of the cutting edge makes it inherently weak – it will develop divots and dents from normal use over time.
While you could sharpen them, at less than $6 a pair it’s not worth the effort.
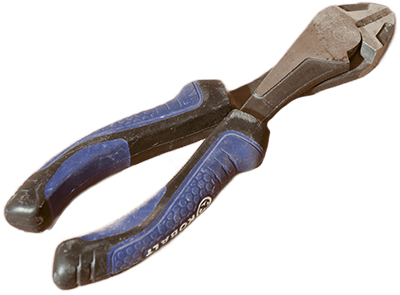
Side cutters are a more traditional tool, with thicker jaws and a double-bevel cutting edge. They don’t cut as cleanly or as close as flush cutters, but a good set will last many years.
Wire Strippers – for stripping the insulation off of wire.
A good set of wire strippers will save you enough frustration to pay for itself many times over.

Manual wire strippers are what come to mind when most people think of them. Essentially pliers with long jaws and curved cutting surfaces for various sizes of wire, manual wire strippers are simple tools.
Some of the better versions have spring-loaded and padded handles, small plier jaws at their tip and a wire cutter at the pivot point.

Automatic wire strippers really aren’t automatic, and I went through four different tools before I found one that works as advertised.
If you don’t do wiring work often, automatic wire strippers may not be worth the investment over their manual cousins.
Wire Crimpers – for crimping terminals onto wire.
Adding connectors to wire can be fairly simple with the right crimping tool. Using the right tool with the right connector is critical to get a good fit.
I used to use simple crimp connectors like forks, rings and butt connectors a lot on the job, and I spent a long time looking for a simple handheld crimper that would make crimps I could be confident would stay in place in harsh conditions.
Klein tools has what I’ve found to be the best tool on the market. It’s simple, built like a tank, made in America and makes crimps in these types of connectors that you can rely on. I’ve been using it for five years now and it works as well as the day I bought it.
While the Klein tool is excellent, it’s really only made for these simple connectors. If you get into more specialized connectors you’ll need specialized tools.
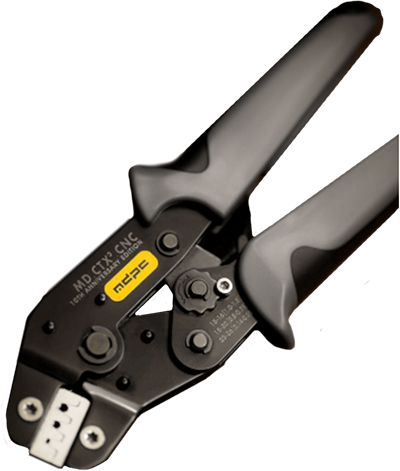
For ATX terminal pins (the pins found in the connectors on your power supply), the MDPC-X MTX3 crimping tool is amazing. If you plan to sleeve your own cables this is a tool to have.
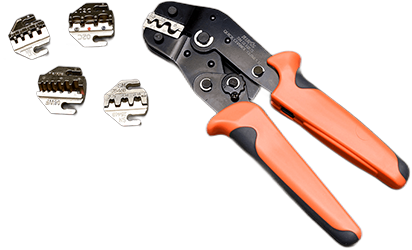
If you’re not sure what kind of connectors you’ll be using, a ratchet crimper with interchangeable jaws will cover about everything.
Like most tools made to do a lot of jobs though, it won’t do a specific job as well as a tool made for that job.
Soldering Iron

A good iron can be had for less than $20US. Look for one with digital temperature control and tips that are held on with a threaded collar instead of screws or threaded into the iron itself.
Unless you enjoy waiting, get one rated at 60 watts minimum.

Forget using a cordless butane soldering iron. I’ll get more into the reasons in our upcoming post on soldering, but in a nutshell they’re simply too hot for this kind of work and they exhaust VERY hot gas out the side of the tip. Not what you want in an enclosed space.
Heat Gun / Torch
Any electrical work you do will need to be insulated. That’s normally done with heat shrink so you’ll need a focused heat source.

The heat guns used for bending rigid tube can be used for this but they generally get a lot hotter than needed for heat shrink and their heat isn’t focused well so be careful not to overheat anything in the area.

Smaller heat guns are more appropriate for heat shrink and easier to use.

That cordless butane soldering iron I warned you about earlier? Many of those will come with an adapter to convert to a hot air blower. Those are *perfect* for heat shrink.
Multimeter

A decent digital multimeter is a must for electrical modding. It should be able to measure voltage, resistance and current at the very least. Backlighting, a stand for easy hands-free reading and a good long set of flexible leads are good bonuses to look for.
Continuity Tester

While a multimeter will test for continuity, a dedicated tester is faster and doesn’t require any settings or knobs. Most don’t even have them.
You touch the probe to one end of the circuit you’re testing and the clip (or bare wire) on the tool to the other end.
If the circuit is complete and closed, the tool itself lights up.
Well – I tried to keep it brief anyway. I did warn you.
Components
While there are electronic components available to do almost anything we could want them to do, I want to focus on the basic general-purpose things we can use for different mods.
Wire – for conducting electricity.

Wire is defined by three categories: current rating, voltage rating and composition.
Current rating the amount of actual electrical flow a wire can handle without heating up. It’s determined by the size of the actual conductor and rated in AWG (American Wire Gauge). 99% of PC mods can be done with wire 18 gauge or smaller.
Voltage rating is the limit to the amount of voltage that can be applied to a wire without passing through it’s insulation. Insulation thickness and material come into play in figuring out a wire’s voltage rating. Since PCs use 12 volts or less most wire will do.
If you end up bringing power into a PC from an external source (like AC wall voltage), be sure your wire is rated for the voltage you’re using.

Composition refers to the material the wire is made of: copper, aluminum or copper-clad aluminum. Any of these will do the job fine for our uses. Copper is stronger and more resistant to breakage through flexing but is more expensive.
Relays – for making connections with other connections

A relay is just an electrically-actuated mechanical switch. The most common type of relay contains a two-position switch and an electromagnetic coil.
I've always found schematic symbols help me understand how components work:

There are five contacts on the simplest and most common relays: two for the coil and three for the switch: common, normally open and normally closed.
The “normal” state in a relay is the position of the switch when there is no electricity applied to it.
When voltage is applied to the coil pins, the switch changes position, to the opposite of its “normal” state. It stays there as long as the coil is energized.

If we wanted to turn on a water pump with the relay above, we would connect one wire (either power or ground) from the pump to the “common” terminal and from the “normally open” terminal to your power source.
Since it’s normally open the circuit won’t do anything until the coil is energized and the switch closes.

If we wanted to turn off the same water pump with the same relay, we would instead connect to the “common” terminal and the “normally closed” terminal. Since it’s a closed circuit the pump would run until we energized the coil – then the switch would open and the pump would stop.
I say all this because a lot of things can be done with combinations of switches and relays. You can have relays triggering relays triggering switches etc – these simple components can build some complex circuitry.
Relays also come in multiple-pole and multiple-throw configurations for even more complex switching jobs.
Timers - for contolling the when

Timer modules are simply relays mounted on circuit boards with other electronics that allow you to determine how long the switch(es) on the relay will remain open or closed on actuation. Some will also let you delay actuation for a certain amount of time and even offer repeat functions.
These are handy if you want to turn something on with a momentary switch but have it stay on for a given length of time.
Connectors
I think we’re all familiar with the standard electrical connectors like butt connectors and ring terminals, but there are a few that are a little less common and can be very handy for modding.

Push-In
No tools required, very difficult to remove wires if needed, can combine several circuits.

Solder Seal
Heat gun required, single use, permanent connection – best possible connection between two wires outside of hand soldering.

Terminal strips
Adaptable, reusable, high voltage and current ratings, requires only a screwdriver – can be made to join as many or as few circuit as you need. Available in sizes from 4 circuits to 60 circuits or more.

Fastlock
For adding a circuit to an existing wire. Durable, waterproof, rated for underground use, reusable.

T Tap
Another conenctor used to add a circuit to an existing wire. Easy to use, comes in single and multiwire configurations - no wire stripping needed.
Lever Lock Connectors
These connectors deserve a section of their own. Simple, secure, reusable, rated for over 200 volts and 30 amps, and available in a wide range of shapes and sizes, lever lock connectors are my favorites by far.

Side by side – every wire inserted it is joined into a single circuit. Available in 2-port, 3-port and 5-port versions.

End to end – each port connects only the port on its opposite side. Available in 1-port, 2-port and 3-port versions.

Special note: Some of the 1-port versions are made to lock together side by side, so you can have as many ports as you want.

Multiplier – each port on the input side connects to multiple ports on the output side. A great way to split a circuit if you need to send power to multiple places, these are available in 2-to-4 and 2-to-6 versions.
ATX Connectors
I’ve deliberately omitted ATX connectors like the ones used on our power supplies, motherboards and video cards. These are complex enough to need their own post and I’ll be covering those in detail in our upcoming post on custom wire sleeving. They're honestly a little too finicky to use easily for general modding anyway.
Ok, so what can we DO with all this?
Like all PC modding, electrical mods are limited only by the modder’s imagination, time, and budget. Here are a few examples of what we can do with electrical mods.
Add-On Switches
You may have systems in your PC that you want to be able to turn on or off manually – lighting is a good example. Adding a switch will let you do that.
There are a few terms used to describe a switch that will help you identify its function.
Latching or momentary – a latching switch stays in the position you put it until you move it back. A momentary switch stays in that position only as long as you hold it there.
Poles and throws – how many connections a switch has and how many directions it travels are described by poles and throws respectively.
A simple on-off toggle switch is a latching single-pole single-throw switch, abbreviated SPST. It moves to one position and has one set of connections.
Again, the schematic symbol can help. Here's a SPST switch:

If you take the same switch and add a circuit to it, so that it will turn on and off two things at once, it becomes a double-pole single-throw switch - DPST.

If you were to take that original SPST switch, but give it two different positions you could switch it to (three connections total) it becomes a single-pole double-throw switch – SPDT.

You can add and change poles and throws in switches as much as you like, though the more complex they are the more expensive they are.
All that could come into play depending on what you’re wanting to do with your switch. If you wanted to control a series of 12-volt fans you could do it with a single-pole single-throw switch. If you wanted to also control a set of 5-volt LEDs at the same time with a single switch you’d need a double-pole single throw model.
Like connectors, there are a lot of options available in switches – they look and actuate differently but they do exactly the same thing.

Toggle switch

Slide switch

Push switch

Rotary switch
These are all simple mechanical switches – which one you choose will depend on the space you have available, how you want them to look and how you want to actuate them.
Minimizing Power Wiring
Most of the things inside of our PCs require power. Lights, panel displays, fans, pumps – they all need electricity to work.
Sadly, the odds of having exactly the right number of power connectors you need for your accessories is pretty slim. You’ll be short a couple or have way too many, leading to wire clutter. <shudder>
One of the ways we can cut down on excess wiring is to branch circuits. If we need one more SATA or 4-pin connector, instead of adding an entire bulky multiport connector to our PSU we can branch a single port into however many additional ports we need.
This is usually done with a splitter cable – effective in branching the circuit but also never the right length.
Assuming you have a modular power supply, chances are you have at least a couple of ports that you aren’t using. That’s power that’s available to use for whatever you need – you just have to tap into it.
Using a spare 12V or 5V circuit, you can add the power ports you need and make the wire exactly the right length at the same time.
You can always cut down one of the multiport cables that came with your PSU to the number you need, but I like to keep those intact myself. It's not that hard to make your own that's exactly the size you need.
To find out exactly which pins you need to connect to on those unused ports, you’ll need to use a digital multimeter with the PC running. Choose a port to use – VGA ports are best for 12 volts while “accessory” ports will have both 12-volt and 5-volt circuits.

Using the probes on your multimeter (with it set on DC voltage), touch the pins in the socket until your meter shows the voltage you want. BE SURE it shows POSITIVE voltage and not negative. You’ll get negative voltage if your positive lead is on a ground pin and your negative lead is on a power pin.

Once you have your pins mapped out you can make your own power wire conencting to whatever voltage you need and make it exactly the length you need.
I’ll go over the process of making your own connectors in our sleeving post later.
Exterior Power
It’s possible to run power from outside the PC into it or from the PC out. This is handy for external cooling solutions for example. If they’re powered by the PC, they turn on and turn off automatically with the PC.
A couple of options for connectors for external power:


Barrel Connector – We’ve all seen these. They’re on every “wall wart” power supply you get with pretty much anything.
The female portion is set up like a bulkhead connector – it has a threaded shaft and a nut with it to hold it in place.
Barrel connectors are limited to two circuits, typically power and ground.


Aviation Connector – These are excellent heavy-duty connectors that come with different pin counts for running circuits through solid panels. A simple 2-pin version is perfect for DC power.
These are set up just like bullet connectors, though the male end is a little more complicated. Their design includes a bump-and-notch setup so that they can only be inserted one way, preventing short circuits and other mishaps.
These are absolutely my favorite connectors. They're rugged, secure, come in a lot of different sizes and look good on top of it.
Both bullet connectors and aviation connectors will require basic soldering equipment and skills to use. They come bare without wire.
Motion
I’m firmly of the opinion that there is not enough mechanical motion in today’s PC mods.
Lights and pumps and screens and fans are all excellent, but if you make something MOVE in your case it adds something extra.
Rotation


If you want to simply make something in your PC turn (I did it with a pair of Yamaha 650 camshafts once), you’ll need a gear motor. Gear motors are just what they sound like – motors with gears.
Gear motors use a tiny geartrain to convert the high speed of a DC electric motor to a much slower rotation with much higher torque. They’re small, affordable and come in a wide range of orientations, speeds and torque ratings. I recommend solarbotics.com if you’re interested in this kind of thing.
If you want linear motion (in a straight line) you can use solenoids or linear actuators.
Solenoids

Like relays, solenoids are simple components that are actuated by an electrical signal. Instead of the magnetic coil inside opening or closing a switch, a rod or shaft is moved when it’s actuated.
While not technically a switch, a solenoid can be used to move other items – including switches.
Solenoids are usually straight-motion devices – a rod on the solenoid moves straight along its axis to a predetermined point when it’s electrified.
Solenoids come in both push and pull versions – push versions move outward away from the solenoid and pull versions move inward.
The strength of the motion of a solenoid is measured in Newtons of force. Tiny solenoids may put out 5 newtons while larger models can generate 50 Newtons or more.
If you’re going to use a solenoid in a PC mod, something is going to move. To be sure the length of motion is correct for your application, look for the “stroke length” on the solenoid’s specifications. That’s how far the rod or shaft will move in total.
Keep in mind when you’re planning your mod that solenoids move FAST. There’s essentially no time between actuation and the end of the movement.
A word of caution on solenoids: the type of solenoids that we would use in PC modding are small low-voltage components. The electromagnetic coil on the solenoid that causes the movement isn’t designed to stay energized. They will get VERY hot if left on for too long. Not all solenoids will have their rated duty cycle listed – if not, you’ll need to determine how long it takes for it to get hot and limit the actuation time accordingly. The timers mentioned above are great for this.
Linear Actuators

For slower controlled movement in a straight line, linear actuators are the best choice. They combine a motor and a long drive screw to produce their movement rather than a magnetic field. This allows for variable speed and a lot more power, but they can be noisy. Like solenoids, they come in different strengths and stroke lengths.
Linear actuators are more expensive and larger than solenoids.
Note: It is possible to use gearmotors to generate linear motion. Attaching the output shaft of a gearmotor to a rack and pinion setup will do it, for example. Given the limited space in most PCs, you may need to get creative in achieving the motion you need.

Between gear motors (and all their accessories), solenoids and linear actuators, just about any kind of motion can be achieved.
Many people are intimidated by the idea of motion mods, but once you understand the basics of the options available it's really no more challenging than a good paint job.
Personally, I'd rather build motion systems than paint any day.
Arduino
For some of the most advanced electrical mods, the Arduino family of microcontrollers is amazing. The Arduino Nano for instance is smaller than a Hot Wheels car but can control something as complex as an engraving laser.

The Porche is looking rough I know, but we've been together a long time.
While I haven’t begun the process of learning Arduino programming yet, you really don't need to know how to use them to realize their potential.
If you look up “Arduino sensor”, you’ll find a range of devices for the Arduino that can detect and measure temperature, noise level, motion, light, air flow and more. The Arduino can be programmed to use the data from these sensors to make external components perform in a certain way. I’ve got a friend who added temperature-controlled ventilation louvers to the top of his case using an Arduino and temperature sensors.
Imagine being able to utilize the formula IF <trigger event> THEN <programmed action> in your modding. If there's a sensor for it, Arduino can plug it into that formula.
The sky really is the limit when it comes to electrical modding if you're fluent in Arduino.
Modding is a hobby, an art form and for many a passion. When most people start into it they're limited by their current skillset, whatever it might be. Every time we learn how to do something new, the limits of our creations are wider than they were. Understanding the electrical side of your PC and all its accessories will let you add some amazing things to your craft.
Have you done any creative electrical mods to your PC? Tell me about it!
1 Comment(s)
Load more comments
Recent Posts